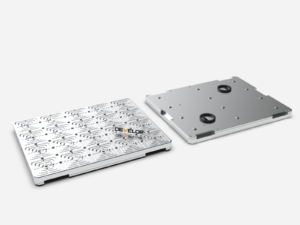
When you are looking to machine parts from raw plate stock, there is no substitute for the workholding of a vacuum chuck. When used correctly, a vacuum chuck can maintain seamless unobstructed downforce pressure to hold your plate stock in place even during high speed spindle machining. A vacuum chuck can be used for quick setups for prototyping, mass production speed, and uniform machining.
But if you are using vacuum chucks for your CNC plate workholding, you may have experienced one or more issues while trying to machine parts:
- Inconsistent vacuum chuck pressure
- Part errors
- Lateral forces moving the plate
- Vacuum chuck gasket issues
- Cutting into the vacuum chuck
- Warped plate stock
- Maintaining pressure on small parts
Our veteran machining experts are here to tell you not only how to mitigate preventable vacuum chuck issues, but how to best save time, money, and effort with CNC vacuum workholding. Here are our top 10 vacuum chuck workholding tips.
Tip 1:
Understand Proportional Vacuum Holding Force
Understand that two different size raw stock plates could have dramatically different holding force, even if they are using the same vacuum power.
The downward holding force on a plate depends on the atmospheric pressure created by your vacuum pump or venturi system spread across the surface of your plate to keep you plate in place. The basic calculation looks like this:
Vacuum Holding Strength = roughly 14 pounds per square inch.
(Note: Since atmospheric pressure determines this number, this figure typically ranges from 13 lbs to 14.7 pounds per square inch at sea level).
Let us compare the holding force of a 20” x 10” plate and a 2” x 3” plate on a vacuum chuck:
The larger plate has a surface area of two hundred square inches. With proper gasketing and maximum vacuum power, 14 x 200 = 2800 pounds of downward holding force. That is plenty of holding force. The regular milling, tapping, and cutting done on a high speed CNC machine mill should not move the plate off-center just by the regular actions of the machine.
The small plate has a surface area of six square inches. Even at maximum vacuum power with proper gasketing, 14 x 6= 84 lbs of downward holding force. That is low enough that the lateral forces from cutting and milling have a good chance of pushing your part off-center from the machine program and off the vacuum seal of your gasket.
We tend to recommend that if your plate size is below 4” x 8”, you supplement your vacuum with workholding accessories and equipment:
- Vises
- Workstops
- Adhesives
- Clips or clamps
Tip 2:
Clean Surface Area
The vacuum seal on your vacuum chuck can be disrupted by interference from chips, grit, coolants, adhesives, even dust. Losing maximum holding force on a plate to mess can at the least ruin the accuracy of your CNC machine cutting and at worst launch a large piece of plate in a random direction during part machining. We recommend cleaning the vacuum chuck between every program.
- Simple car spray wax can repel dirt off of your vacuum chuck and workpiece plate.
- Remove residues with a microfiber general purpose towel.
Tip 3:
Gasketing Tips
Gasketing your vacuum chuck with an annular chemically resistant foam material is a requirement if you don’t use card layer gasketing, especially for coolant based vacuum chuck CNC machining. Improper gasketing can cause vacuum pressure leaks and incomplete vacuum seals on a vacuum chuck. Here are some ways to mitigate the common missteps in gasketing:
- Make sure your gasket is tightly compressed into the grooves close to the outside perimeter of the plate you are machining.
- Make sure the spliced ends of your gasket are tightly compressed and flush at the ends when you fit them into the grooves of the vacuum chuck. Compress the ends flush on a straight section of the gasket groove rather than a rounded edge or corner.
- Avoid gluing the spliced ends of your gasket together. A compressed seal combined with vacuum pressure is plenty to maintain vacuum, exposing glue to coolants and unpredictable glue drying patterns risks causing bumps in your gasketing or incomplete gasket connection.
Tip 4:
Permeable Card Layers For
Dry Gasketing
You can reduce your setup in dry vacuum workholding CNC applications by using permeable card layer gasketing instead of foam gasketing.
- Less risk for vacuum issues than manually applied foam gasket.
- Card gasket replacement is quicker than managing fitting foam gasket, splicing flush ends of foam gasket material, and managing foam gasket compression.
- Increased card surface area creates an even vacuum pressure.
- One card can cover the area of multiple vacuum chucks on the same machine.
- Provides a thin sacrificial layer between the vacuum chuck and the plate that does not lose vacuum if cut through.
- Permeable card gaskets can come with an adhesive layer to assist small tricky part vacuum chuck workholding.
Tip 5:
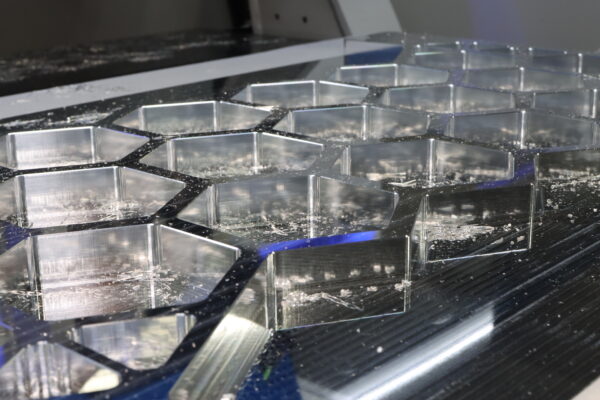
Roughing Without Fully Cutting Out Small Parts
Especially when cutting small parts out of a raw stock plate, cutting the part entirely through the bottom of the raw stock plate risks weakening the vacuum or launching your part off of the workpiece into areas you do not want. Instead of running a program that finishes cutting each part one at a time all the way out, run your program so it leaves a thin layer (we like .1-.25mm) of material at the bottom of the plate still connecting your parts to the plate.
- A thin fraction of a millimeter foil skin at the bottom maintains the vacuum.
- Keeps parts from traveling or moving as your CNC machine cuts out other parts.
- Supports fast milling and heavy cutting forces in the first pass.
On your final pass, you can apply a lower cutting force to detach the parts from the workpiece with less risks of depleted vacuum strength or loose parts. To make this process successful make sure to purchase raw material that comes with a flatness tolerance or follow #6.
Tip 6:
The 3 Step Skim Method for Increasing Raw Plate and Bar Flatness
When dealing with raw plate on a vacuum chuck, you can experience warping, bowing, or lowered flatness tolerance depending on storage conditions or supplier tolerances as raw bar and plate have stresses that have not been relieved. Even if you manage to maintain vacuum on raw stock with inconsistent flatness tolerances, machining on that plate can release stresses in a way that changes the tolerances of your raw stock in the middle of your CNC program. You can mitigate these tolerance issues and changes in stress with our three step skim method:
- First, face mill a half millimeter to a millimeter off of the top surface of your plate or bar stock.
- Second, flip the plate and mill a half millimeter or millimeter skin off of the bottom side of your plate or bar stock.
- Third, take one last half a millimeter to millimeter skin off the top surface of your plate or part stock again.
These values are a general rule of thumb. Make sure to make a recipe that works with your materials.
Tip 7:
Vacuum Chuck Alongside Fixture Plate
We mentioned roughing your small parts by leaving a thin foil membrane at the bottom still connecting the part to the plate, but what do you do for extremely small parts that really need workholding accessories to hold them?
We recommend instead of covering the entire table of your machine with a vacuum chuck, you split the CNC machine vacuum table with a smaller vacuum chuck plate next to a fixture workholding plate (This is the ideal application of our Vacuum Fixture System, the combination staying power of conventional vacuum chucks with the versatility of a fixture plate system).
- You still machine your parts in the first operation on the vacuum chuck, leaving your parts connected by a foil membrane.
- In the second operation, you move the parts over into the fixturing and workholding side of the vacuum fixture system.
This saves you time on setup.
Tip 8:
Stepping Down Pressure Tool Cuts
With complex cutting options available it is understandable a lot of vacuum chuck machinists jump to the largest cutting tools at the fastest rates, but we want to caution you against putting too much pressure and lateral force on your plate material.
- Your vacuum forces your plate downward onto the vacuum chuck and that force is weaker with side-to-side tool pushing.
- A large tool exerts more force against the plate and against detached parts, increasing the risk of location errors or loose parts.
Multiple quick passes with a smaller, stronger, sharper cutting tool can complete your job at an equivalent rate with less risk.
Tip 9:
Creating Vacuum with a Venturi Kit Versus a Vacuum Pump
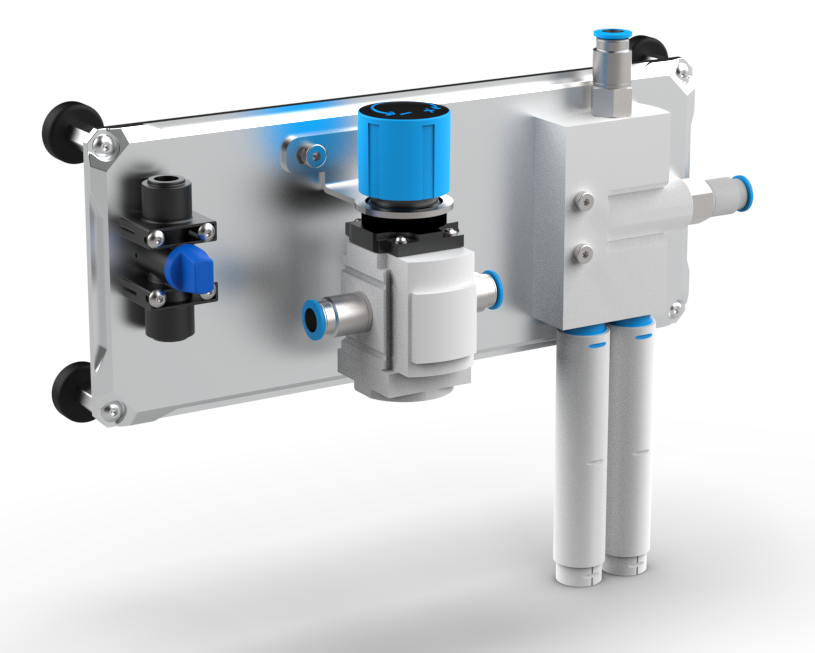
Creating your vacuum for your vacuum workholding typically comes in a choice between installing a Venturi Kit or using a traditional Vacuum Pump. Both are excellent choices for maintaining the vacuum on a vacuum chuck, understanding the nuances of their strengths and purposes though will help you decide which makes the most sense for your vacuum powered workholding projects.
Venturi Kit
- Pressure Difference Workholding- While a vacuum pump utilizes suction, a Venturi Kit creates vacuum by speeding the flow of fluid or gas through a constricted system and creating a pressure difference.
- Cost Effective Upfront Price Tag- While prices may vary, a Venturi Kit typically costs ten times less than a vacuum pump in the same application.
- Perfect for Fluids- Fluids from wet workholding projects, such as coolant applied while vacuum workholding, pass through the Venturi Kit without obstruction. A vacuum pump will require a filtration system capable of protecting the vacuum pump on wet applications which will increase the price tag.
- Requires an Air Compressor- You will need a separate air compressor to run your Venturi Kit (we typically recommend a minimum of five horsepower to power a Venturi Kit). While many shops have an air compressor of this size on site, this does increase the investment cost of a Venturi Kit. Also, the cost of running a compressor long term costs more on power than a vacuum pump.
- Lightweight and Simple- The average Venturi Kit weighs a few pounds versus a vacuum pump which may weigh hundreds to thousands of pounds. This makes a Venturi Kit portable and makes Venturi Kit parts easy to replace.
Vacuum Pump
- Suction Workholding- A vacuum pump relies on suction based vacuum workholding on your vacuum chuck.
- Cost Effective Long Term- Even with a vacuum pump costing on average ten times more upfront with a Venturi Kit, vacuum pumps have greater efficiency, longer and more consistent negative pressure, and when it reaches draw it requires less energy to run. Long term a vacuum pump is a less costly investment than a Venturi Kit.
- Perfect for Dry Workholding- Dry vacuum workholding works great with a vacuum pump. You will need to invest in a filtration mitigation system for your vacuum pump or invest in a model that specific filters moisture to protect your pump.
- Scalable- While you can run a stronger air compressor on a Venturi Kit for more power, the upper scalability limit is lower. There are a variety of vacuum pump options with much more power, application specific design, and options to run vacuum pressure to multiple vacuum chucks. As you grow your business, it may make sense to invest more in vacuum pumps and use Venturi Kits as secondary support.
- Durable- The operating life of a vacuum pump, power, and durability is much higher than a Venturi Kit. A Venturi Kit works for almost all vacuum chuck workholding applications, so it’s important to weigh your budget against the choice between a Venturi Kit and a vacuum pump for vacuum chuck workholding.
Learn More: Magnetic Venturi Kits for Vacuum Fixturing
Tip 10:
Know Your Applications in Relation to the Business
Vacuum chuck workholding allows you to micromachine detail into plate fixtures, parts, and prototypes, but it is important to not obsess over an Instagram optimized part in every circumstance.
- If you are running a one off job, your focus needs to be on paying for your CNC machines, paying your workers, and getting those quality parts through your machine.
- While the goal of a prototype is to scale to mass production, make sure your team is communicating with purchasing and sales to temper expectations on parts where mass production is not realistic.
- Quickness and cost effectiveness make a bigger impact on a customer.
If you are ever concerned you might be running an inefficient shop and you might be losing money on labor and rework in the name of over design, run this test:
- Pick a project and run two versions of it.
- In the first version, try to nail the singulation, orientation, and tolerances for a perfect part. Refine until you think you cannot make changes to improve the design. Then run the part on the vacuum chuck and evaluate the part.
-
-
- Does it meet the minimum satisfaction of the job?
- Does it exceed the satisfaction of the job significantly?
- Were there any errors, issues, or problems with the outcome, even ones that would prompt a revision?
- How long did the process take from beginning to end and how many hours of labor did you use?
-
-
- In the second version, try to make the part as quickly as possible to meet the minimum satisfaction requirements of the project. Machine the part on the vacuum chuck and then do an evaluation.
- Evaluate any issues, defects, or quality issues. Throw out the first attempt and run the job again with the lessons learned from the first attempt and revisions made to the program.
- Evaluate the second run for minimum satisfaction.
- In the second version, try to make the part as quickly as possible to meet the minimum satisfaction requirements of the project. Machine the part on the vacuum chuck and then do an evaluation.
- Once you have completed both versions of these jobs, compare the costs, time, and effort involved. If the first version took more time, cost more (even compared to throwing away material in the second version) and did not achieve a result that was significantly better than the second version, that is a sign you need to reevaluate your design process.
We hope you enjoyed these Vacuum Chuck Workholding Tips. Whether you are machining a prototype part on aluminum plate or machining a run of thousands of parts, a vacuum chuck can give the workholding strength you need for speed, quality, and cost effective machining. We have partnered with dozens of customers for their unique manufacturing needs.
Tell us more about your project, schedule a virtual meeting, or call (262)-622-6104 to discover how we can put our high volume mass production manufacturing capacity to work for you company growth.
Learn More: Choosing the Right Manufacturing Partner
About the Authors:
Matt Moseman leads as President of DEVELOP, with a strong foundation from the Milwaukee School of Engineering, where he earned both a Bachelor’s and a Master’s in New Product Management. Moseman’s career highlights include his pivotal role in founding NodeUDesign, innovating in automation hardware, and driving DEVELOP LLC to the forefront of industrial robotics with a focus on enhancing productivity and efficiency.
Sean McKittrick, as Project Program Coordinator at DEVELOP LLC, brings a multifaceted background from Knox College. McKittrick’s first year at DEVELOP LLC has been marked by significant team growth and zero turnover, showcasing his ability to build a collaborative and effective work environment. His experience spans quality management in healthcare software to managing production for a million pounds of material monthly, highlighting his diverse expertise in project coordination and manufacturing excellence.